In this post I will explain how to configure a SharePoint Server Farm.
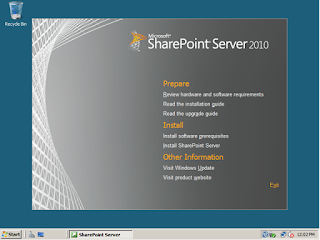
Run SharePoint Server 2010 Application file, system will extract files and show the below screen, under Install > click Install Software prerequisites.
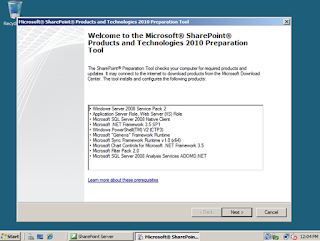
Click on Next in the wizard.
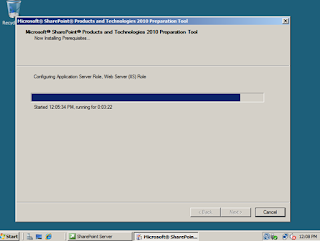
Complete the installation wizard and System will run for few minutes and display the following error message:
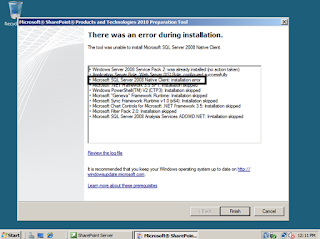
Install your prerequisites software that you downloaded one by one (if possible, follow the above order as shown in the error message). Note: If you try to install Hotfixes from your Share Folder system may prompt “error code 0x80070003” please copy your hotfix files to Windows server and click Install.
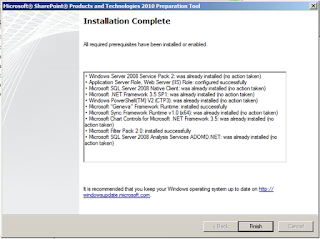
Once you get the above screen “Installation Complete”, click "Install SharePoint Server” link:
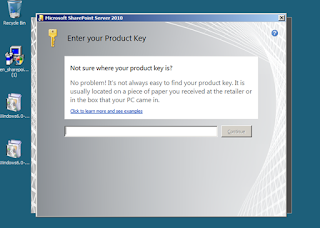
SharePoint 2010 Installation screen prompts for Product Key. Enter the Product key and press ‘Continue’.
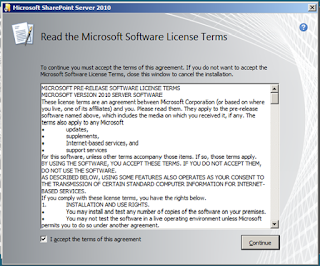
Read your License terms and click I accept and start Installation:
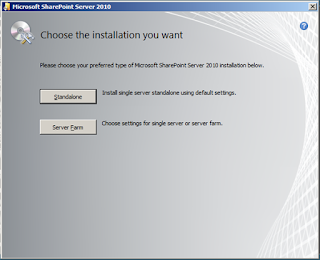
Select Server Farm option and Click on next. Here again we can Server Type Stand-alone or Complete installation here we are selecting Complete Installation. We can also choose installation folder in File location tab here.
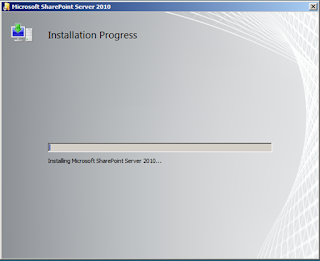
System will start the Installation process.
System would take several minutes to complete installation and prompt for Configuration Wizard.
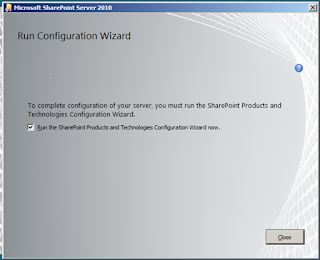
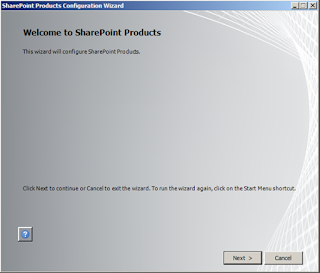
Run your Configuration wizard and click next:
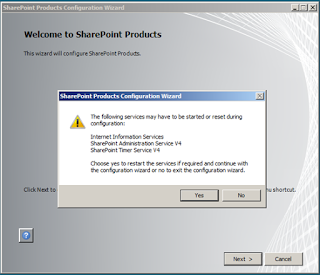
In Configuration wizard click “Yes” to start IIS and SharePoint Admin, Timer service. SharePoint will start configuring the SharePoint farm.
If you selected Server Farm option while installation Wizard will look like this.
Here again we can Server Type Stand-alone or Complete installation here we are selecting Complete Installation. We can also choose installation folder in File location tab here.

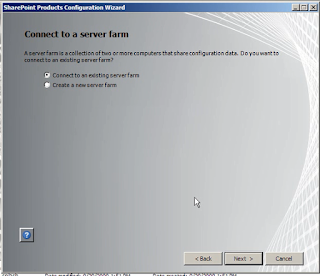
Select if you want to connect the sharepoint to existing Farm or you want to configure new farm. Here we select to configure a new Sharepoint Farm.
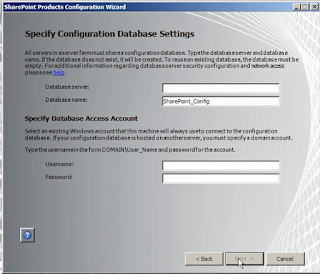
Here select your SQL server 2008 R2 (Minimum) and provide Configuration Database name and User name and Password for the user. Please make sure to provide a user whose password does not change or expire. User must have Securityadmin, DB_owner, dbcreator rights on the SQL server for installation as recommended by Microsoft but we suggest to provide user in sysadmin rights on SQL to install the SharePoint.
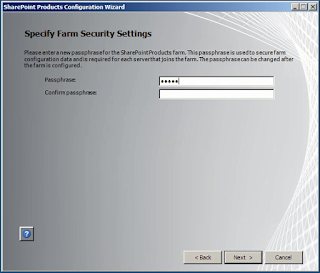
Please provide the Passpharse and click on next, so that you can add other sharepoint in this form by providing this passphrase.
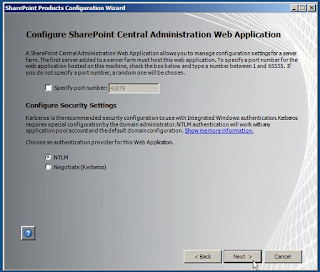
Provide the port where you want to host the SharePoint on the server and provide the Security Settings here we are selecting NTLM. These security settings can be changed later. Click on next.
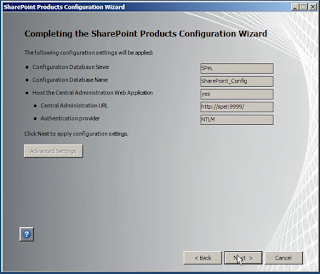
Now wizard will show the configuration setting selected by you. Check once and click on next.
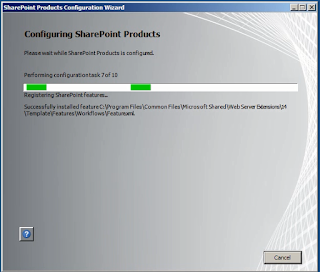
Then Configuration wizard will continue 2 of 10 tasks.
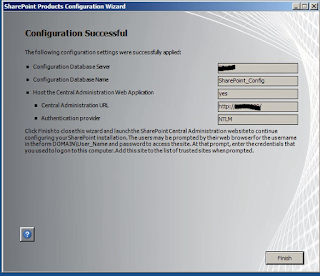
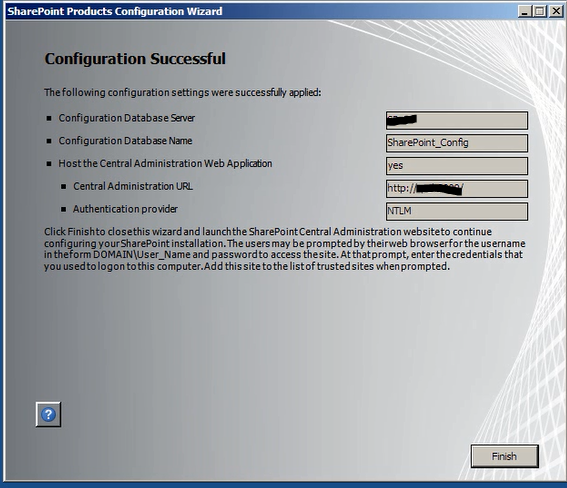
If everything is OK, the system will display the following screen. Click on Finish.
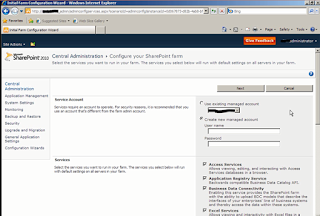
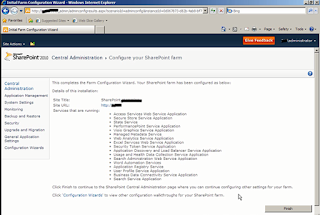
Congratulations your SharePoint 2010 is now installed. It will be opened in browser like this and will ask you configure the SharePoint Services on the server. Here we are using wizard to configure the services. User can configure the same manually.

Click on next to complete the configuration of the farm and its services. Select the service and the service account user who will operate the services and click on next the wizard will do the process.
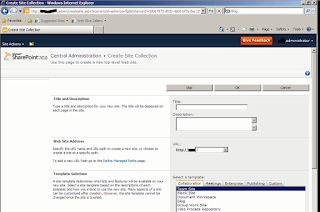
After process the wizard will ask you to create a site collection. And will show the below screen. Please provide Site Title, Description and select the Template and click on OK.
After completing the configuration and creating new site collection wizard will show below screen. Click on OK or you can now open you site.
Now your SharePoint is ready to use. You can see the Central Administration screen as below.
Run SharePoint Server 2010 Application file, system will extract files and show the below screen, under Install > click Install Software prerequisites.

Click on Next in the wizard.

Complete the installation wizard and System will run for few minutes and display the following error message:


Install your prerequisites software that you downloaded one by one (if possible, follow the above order as shown in the error message). Note: If you try to install Hotfixes from your Share Folder system may prompt “error code 0x80070003” please copy your hotfix files to Windows server and click Install.

Once you get the above screen “Installation Complete”, click "Install SharePoint Server” link:
SharePoint 2010 Installation screen prompts for Product Key. Enter the Product key and press ‘Continue’.

Read your License terms and click I accept and start Installation:

Select Server Farm option and Click on next. Here again we can Server Type Stand-alone or Complete installation here we are selecting Complete Installation. We can also choose installation folder in File location tab here.

System will start the Installation process.

System would take several minutes to complete installation and prompt for Configuration Wizard.

Run your Configuration wizard and click next:

In Configuration wizard click “Yes” to start IIS and SharePoint Admin, Timer service. SharePoint will start configuring the SharePoint farm.

If you selected Server Farm option while installation Wizard will look like this.
Here again we can Server Type Stand-alone or Complete installation here we are selecting Complete Installation. We can also choose installation folder in File location tab here.

Select if you want to connect the sharepoint to existing Farm or you want to configure new farm. Here we select to configure a new Sharepoint Farm.

Here select your SQL server 2008 R2 (Minimum) and provide Configuration Database name and User name and Password for the user. Please make sure to provide a user whose password does not change or expire. User must have Securityadmin, DB_owner, dbcreator rights on the SQL server for installation as recommended by Microsoft but we suggest to provide user in sysadmin rights on SQL to install the SharePoint.

Please provide the Passpharse and click on next, so that you can add other sharepoint in this form by providing this passphrase.

Provide the port where you want to host the SharePoint on the server and provide the Security Settings here we are selecting NTLM. These security settings can be changed later. Click on next.

Now wizard will show the configuration setting selected by you. Check once and click on next.

Then Configuration wizard will continue 2 of 10 tasks.

If everything is OK, the system will display the following screen. Click on Finish.
Congratulations your SharePoint 2010 is now installed. It will be opened in browser like this and will ask you configure the SharePoint Services on the server. Here we are using wizard to configure the services. User can configure the same manually.

Click on next to complete the configuration of the farm and its services. Select the service and the service account user who will operate the services and click on next the wizard will do the process.

After process the wizard will ask you to create a site collection. And will show the below screen. Please provide Site Title, Description and select the Template and click on OK.

After completing the configuration and creating new site collection wizard will show below screen. Click on OK or you can now open you site.

Now your SharePoint is ready to use. You can see the Central Administration screen as below.
No comments:
Post a Comment