Showing posts with label SharePoint 2013. Show all posts

Friday, 29 July 2016

SharePoint Architecture

Today I am defining the normal Architecture of SharePoint -

Architecture of SharePoint –

1-Tier: all above layers can only run in one computer. In order to achieve 1-Tier, we need to use the embedded database system, which cannot run in an individual process. Otherwise, there will be at least 2-Tier because non-embedded databases usually can run in an individual computer (tier).   

2-Tier: Either presentation layer and application layer can only run in one computer, or application layer and data layer can only run in one computer. The whole application cannot run in more than 2 computers. 

3-Tier: the simplest case of N-Tier architecture; all above three layers are able to run in three separate computers. Practically, these three layers can also be deployed in one computer (3-Tier architecture, but deployed as 1-Tier). 

N-Tier: 3 or more tiers architecture. Diagram 2 below depicts a typical N-Tier architecture. Some layers in 3-Tier can be broken further into more layers. These broken layers may be able to run in more tiers. For example, application layer can be broken into business layer, persistence layer or more. Presentation layer can be broken into client layer and client presenter layer. In diagram 2, in order to claim a complete N-Tier architecture, client presenter layer, business layer and data layer should be able to run in three separate computers (tiers). Practically, all these layers can also be deployed in one computer (tier). 

Usage of Different Tier Architectures of SharePoint -

1-Tier: Normally this architecture is used in development environment.  This is a standalone SharePoint installation that contains all the services, web applications, SQL server, Central Administration in one machine. We can also install a complete farm SharePoint but we will not add any other server in this farm otherwise it will become 2 or more tier architecture.
2-Tier: Normally this architecture is used in development/preprod environment. There are two machine that are sharing the load from SharePoint. This can be used where we have SQL server installed on different machine. In this mode we can use both standalone installation or farm installation but if we install a farm then we will not add any other server in this farm otherwise it will become 3 or more tier architecture.
 
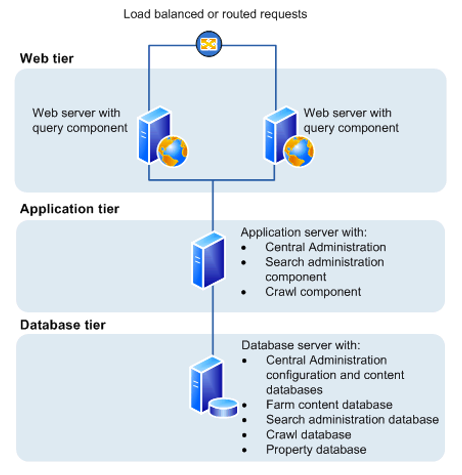
3-Tier/N-Tier: This is a complete SharePoint farm installation, where we a have a Database server, Application server and Web Front End (WFE) servers. This architecture is used in Preprod or Prod Environment.

In a typical 3-tier architecture there is -
 
One Database server – This server contains the SQL server database, that hosts the SharePoint and its databases. 
One Application server – Normally this server hosts Central Administration, and SharePoint services and service applications. 
Two Web Front End servers – This server hosts all web custom applications in the SharePoint farm, most of custom SharePoint features, wsp solutions are installed on these servers only. 

A WFE can be identified by "Microsoft SharePoint Foundation Web Application" service. This service is not started on a application server. 

SharePoint Usage

Today I am Providing some basic and useful information about SharePoint -

What is SharePoint?
SharePoint is web based portal that uses IIS web sites to share different type of data and information securely. This is a very easy tool that can be used by any size of organizations may be small, Medium or large. SharePoint is available onprime (local Machine) or online. SharePoint can be installed on a Windows Server Machine and can be accessed from anywhere in the network. Even without knowing the physical location of the files. SharePoint keeps its data on SQL server. Basically SharePoint is data and information Sharing Software.

As per Microsoft –

SharePoint is a collaboration environment that organizations of all sizes can use to increase the efficiency of business processes.
SharePoint sites provide secure environments that administrators can configure to provide personalized access to documents and other information. Search features enable users to find content efficiently regardless of the physical location of data.

Usage of SharePoint –
SharePoint is very useful in different scenario. Here I am defining some of them.
Documents – User can store documents in SharePoint and share it with other users and limits then from performing the operations on the documents. SharePoint Usages Permissions that can be given of item levels that is different items can have different permissions. And the allowed users can perform task on the SharePoint.
Calendars – User can store calendars events and create your schedule and store in SharePoint and share it with other users and limits then from performing the operations on the events. SharePoint Usages Permissions that can be given of item levels that is different items can have different permissions. And the allowed users can perform task on the SharePoint.
Surveys – SharePoint can be used to do surveys in your local environments and online environments as well.
Task and Projects – You can manage your tasks and projects in SharePoint and assign them to related persons as well.
Collaboration – SharePoint’s Newfeed, user profile, collaboration features enable user to share their thoughts, like and comments on the each other posts, Share their Knowledge.
SharePoint is capable to send email alerts, automation tasks, data sharing in a secure environment.

Thursday, 14 January 2016

SharePoint 2013 Limitations

Below are some limitations of SharePoint 2013. Refer to Microsoft Technet Article for more details.

Web Application - 20 per Farm Supported
Site Zone - 5 per Web Application Fixed
Managed Path - 20 per Farm Supported
Application Pool - 10 per Web Server
Content Database - 500 per Farm
Content Database Size - 200 GB per Database
Items in Content Database - 60 Millions per Database
Site Collections - 10000 per Content Database and 750000 per Farm
Sub Site - 2000 per Site Collection
Web parts - 25 per Page
Documents - 3 Crore per Library
Items - 3 Crore per List
Major Version - 400000 Supported
Minor Version - 511 Fixed
Bulk Operation - 100 items at a time
List/Library View Threshold - 5000 Can be increased
Lookup Threshold - 8 Lookup columns
User in a Collection - 2 Million

Wednesday, 13 January 2016

Checking if Load Balancing is working fine

Go to any web front and server connected on Network Load Balancing Manager.
  1. Select Start Menu
  2. Select Administrator Tools
  3. Click on Network Load Balancing Manager.
  4. Right click on any listed web front end server under "Network Load Balancing Clusters".
  5. Select Control Host.
  6. Click on Stop.
  7. Now check the SharePoint Site using the load balancing url and it should work properly.
  8. In same way stop each or multiple servers and site should be available until any single WFE  is started.
  9. Finally Stop all WFEs now site should not be available.

Configuring Alternate Access Mapping in sharepoint

Hi All,

As in previous posts i mention how to configure Network Load Balancing. Now i am going to mention how to configure Alternate access mapping to use this load balancing in sharePoint.


  1. Open the Central Administration.
  2. Open Application Management.
  3. Select "Configure Alternate Access Mapping" Under Web Applications.
  4. Select your web application that you want to use with load balancing.
  5. Under "URL Protocol, host & port", enter the URL that we provided while configuring Network Load Balancing on First Web Front End server.
  6. Click on OK.
  7. Now you will see the new URL in the Alternate Access Mapping list of the web application.

Congratulations, Now your web application is using the load balancing service.

Configuring Network load Balance on other SharePoint Web Front End Servers

As already defined in previous post please make sure that we provide Static IP to the server. Please do not use DHCP. That is provide the IP to each server manually.
  1. Select Start Menu
  2. Select Administrator Tools
  3. Click on Network Load Balancing Manager.
  4. Right click on Network Load Balancing Clusters.
  5. Click on Connect to Existing.
  6. Enter Host name (The IP address we provided in previous post for load balancing) in "Connect to Existing: Connect" window.
  7. Click on Connect. if the host name is correct then you will see "Connected" in "Connection Status" you will be able to see the Interface IP, name and Cluster name of the network load balance under "Interfaces available for configuring a New Cluster".
  8. Once IP and Name is displayed, Click on Finish.
  9. You will now see the server name of WFE1 listed under your "Network Load Balancing Clusters" of "Network Load Balancing Manager". Right-click on the server name and Select "Add Host to Cluster".
  10. Enter Host name (this will be your current server name the new wfe) in "Add Host to Cluster: Connect" window.
  11. Click on Connect. if the host name is correct then you will see "Connected" in "Connection Status" you will be able to see the Interface IP, name and Cluster name of the network load balance under "Interfaces available for configuring a New Cluster".
  12. Once IP and Name is displayed, Click on Next.
  13. As this the other WFE, provide "Priority (unique Host Identifier)" as 2 (and so on for other wfe's it should be unique) and select Started in "Default State" under "Initial Host State" in "Add host to Cluster: Host Parameters" window.
  14. Click on Next "Add host to Cluster: Port Rules" you will be able to see the rules of the newly Created cluster..
  15. Click on Finish.
Now In the Network Load Balancing Manager window, you will see the server names for WFE1 and all other WFEs listed.

Congratulations, your new web front end server is ready to accept the load through Network load balancing Manager.

Configuring Network load Balance in first SharePoint Web Front End Server

Before we start load balancing make sure that we provide Static IP to the server. Please do not use DHCP. That is provide the IP to each server manually.


  1. Select Start Menu
  2. Select Administrator Tools
  3. Click on Network Load Balancing Manager.
  4. Right click on Network Load Balancing Clusters.
  5. Click on New Cluster.
  6. Enter Host name (That is your system name of the WFE1) in "New Cluster: Connect" window.
  7. Click on Connect. if the host name is correct then you will see "Connected" in "Connection Status" you will be able to see the IP and name of the of the network under "Interfaces available for configuring a New Cluster".
  8. Once IP and Name is displayed, Click on Next.
  9. As this the first WFE, provide "Priority (unique Host Identifier)" as 1 and select Started in "Default State" under "Initial Host State" in "New Cluster: Host Parameters" window.
  10. Click on Next.
  11. Click on Add in "New Cluster: Cluster IP Addresses" window and select "Add IPV4 Address" and give a new IP address that is not used in any server or system yet.
  12. Click on OK.
  13. Click on Next.
  14. Here in "New Cluster: Cluster Perameter" enter a "Full internet name" i.e. internet URL eg. "testloadbalance.local" that will be used later in Alternate Access mapping in SharePoint. In Alternate Access Mapping we will provide "http://testloadbalance.local".
  15. Select Multicast in "Cluster Operation Mode".
  16. Click on Next "New Cluster: Port Rules" you will be able to see the rules of the newly Created cluster..
  17. Click on Finish.

Congratulations, your first web front end server is ready to accept the load through Network load balancing Manager.